Indigo Pads 2
A short tutorial for the new INDIGO PADS 2
This App was designed with Kids in mind! Everything is will just sound nice!
2016:
Indigo Beat Machine
Here You find a Quick overview of the our Beat Machine features:
https://www.youtube.com/watch?v=_4uBKz-cAy8
1. Recording / Record-Button
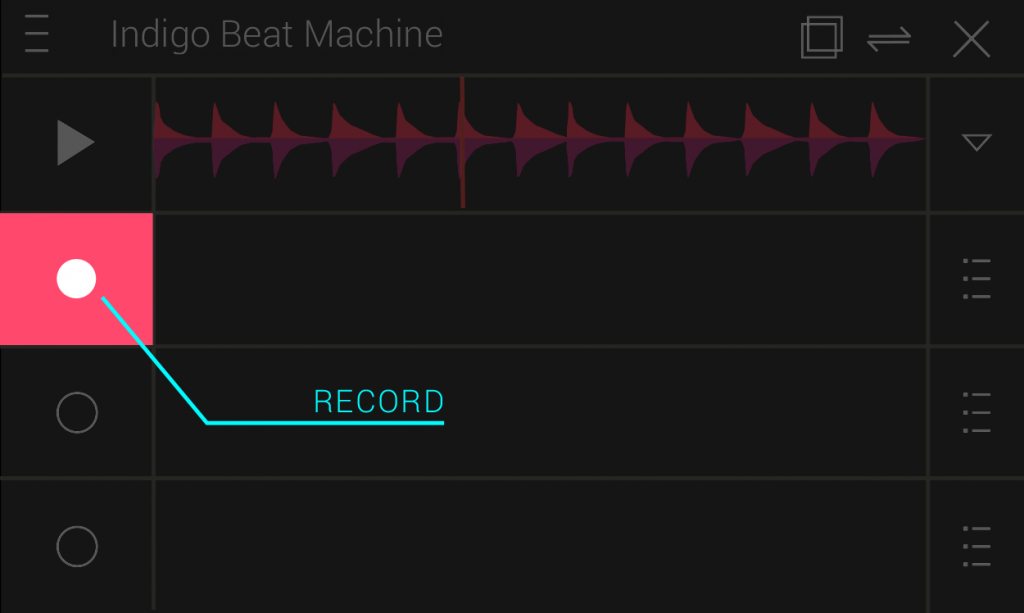
Record up to four Tracks.
Clicking one of the RECORD Buttons will immediately start the recording.
Clicking on the same RECORD Button again will stop the recording.
Create empty Tracks by deleting [see DELETE-Mode].
If you want to create a Beat with a new overall tempo (different BPM- Beats per Minute) – delete ALL previously created Tracks, Otherwise the internal GLOBAL-CLOCK is taking care of the exact loop length for you! This feature ensures that you will always get perfectly fitting loops!
2. Loading Beats / Load-Button
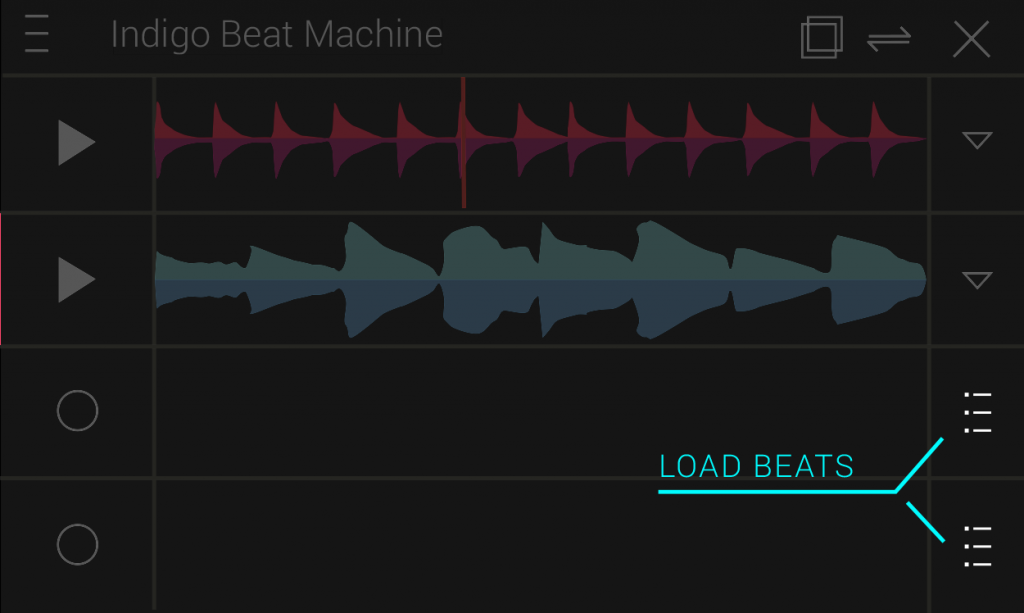
Instead of recording a Track you can also LOAD a previously recorded Track!
Clicking on the BEAT-List Button of an empty Track will show you the list of stored BEATS on your Device.
Clicking on the LOAD Button will bring you back to the main-screen and load the selected Beat.
If you have any Track existing while loading a new one – than the loaded Track will adopt the tempo of the existing Track! This guarantees perfectly fitting loops!
You can download more Beats from our GOOGLE-Play website!
All Beats are stored in the /Beats/ Folder of your devices internal storage – they will NOT get deleted if you uninstall the application.
3. Stop | Play | Volume
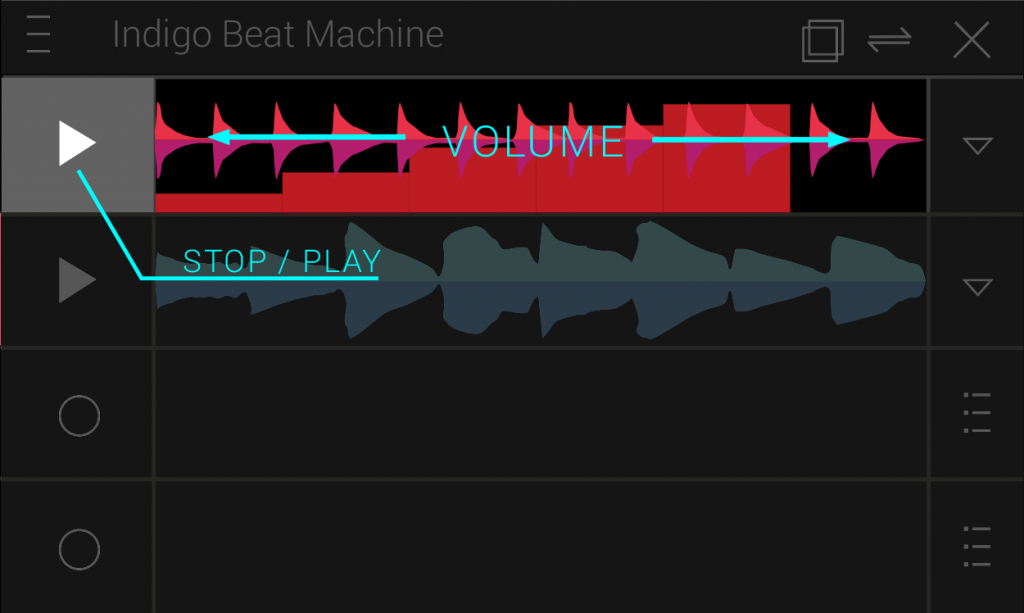
Each non-Empty Track will have the RECORD Button replaced by the PLAY Button!
Clicking on the PLAY Button will start and stop the playback of the Track.
The Track will always be started according to its start-position – if you want to change the
start-position of a Track see: Global Functions / Change-Delay.
Next to the Play Button you see the TRACK-STREAM-Display displaying the recorded and modified WAV-File. This area is used to set the individual volume of each track, as well as for the globalfunctions [see MERGE-Tracks, Change-DELAY, DELETE-Mode].
To set the individual Volume of one Track, slide left and right with one finger upon
the TRACK-STREAM-DISPLAY area!
4. Global Functions
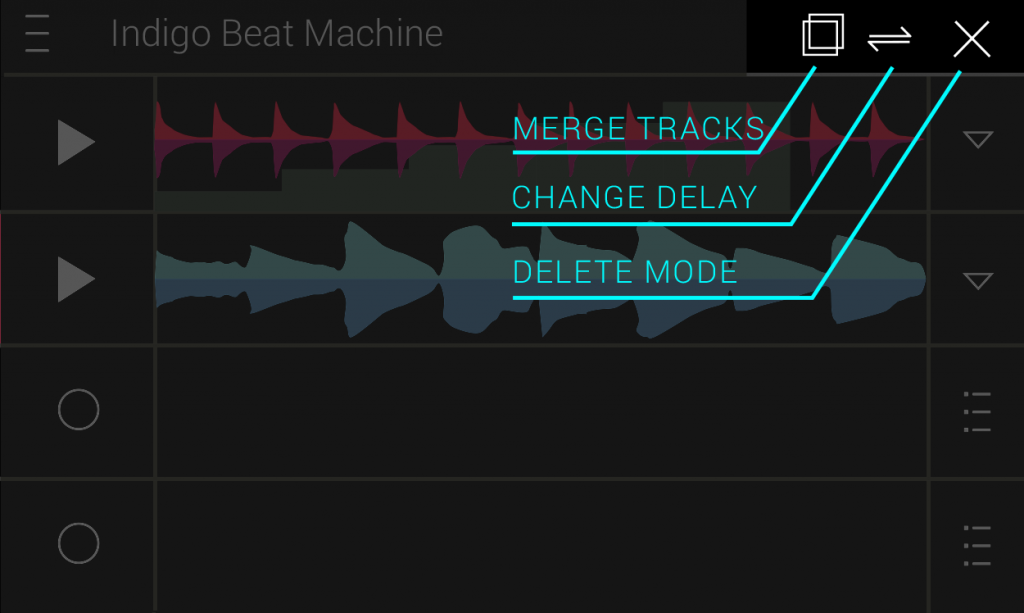
The Global Option Buttons provide following features:
Merge-Tracks
In MERGE-Tracks mode you can merge two Tracks into one Track – simply click one
Track and ‘drag and drop’ it one top of another Track.
Note that this might involve heavy RESAMPLING computation! This means the longer the recorded Tracks are, the longer you will have to wait for this method to finish…
Change-Delay
In Change-DELAY mode you are able to adjust the start-positions of all Tracks. One Tick of
the appearing TIMERWHEEL will change the start-position of the Track by 5 milliseconds.
This feature is good to create Echo-Sounds, or to simply fine adjust your BEAT!
DELETE-Mode
Click the DELETE-Mode Icon and choose the Tracks you want to delete.
This will permanently erase your Track!
A previously-saved Track will still be available in the BEAT-List (see Load Tracks)
5. Opening the TRACK-Menu
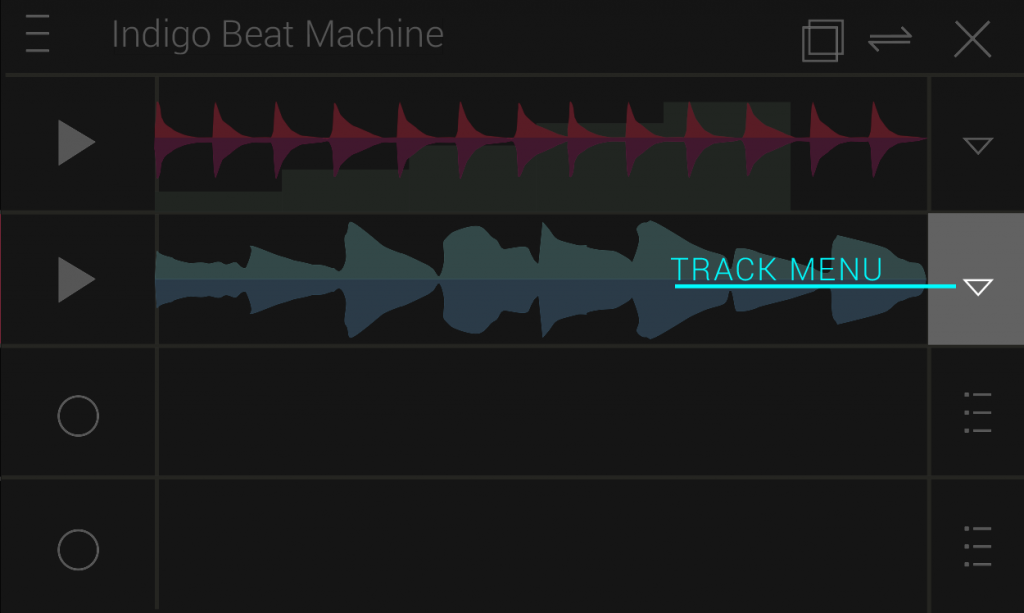
Each non-Empty Track will have the BEAT-List Button removed by the TRACK-Menu Button! Clicking on the TRACK-Menu Button will open the TRACK-Menu of this Track.
Inside the TRACK-Menu Options to set Loop point positions, Change Tempo / Change Pitch, use the sequencer, save the Track just as it sounds right now with all your modifications! [see TRACK-Menu for more details].
6. The TRACK-Menu
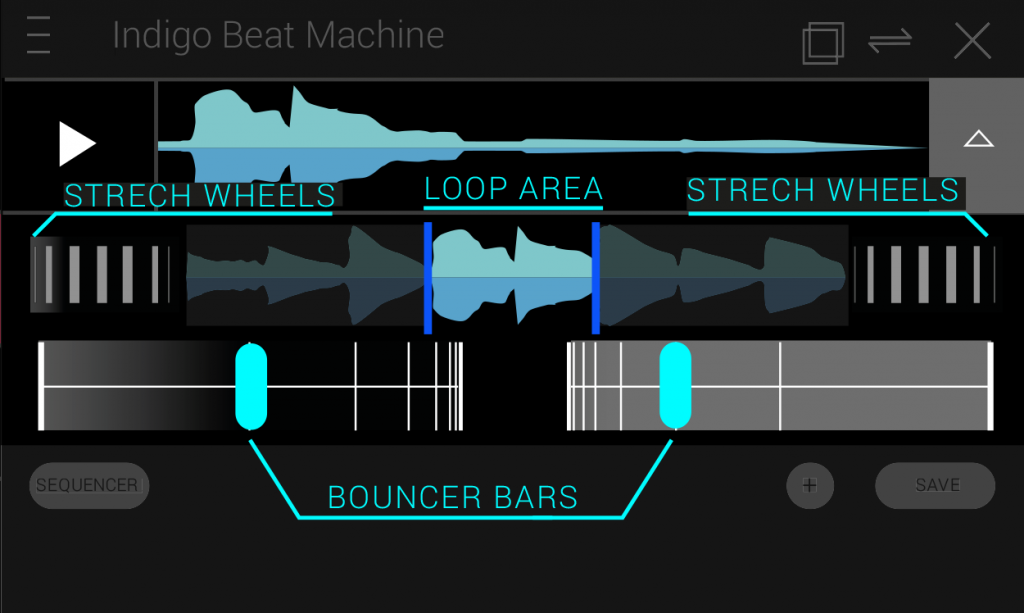
STRETCH-Wheels
Using the STRETCH-Wheels you can change the looppoint positions of the Track while at the same time streching or compressing the PLAYBACK-Rate of the Track .
BOUNCER-Bars
Using the BOUNCER-Bars you can change the looppoint positions of the Track WITHOUT changing the PLAYBACK-Rate! This will increase or decrease the length of your Track by the power of two.
LOOP-Area-Display
The smaller TRACK-STREAM-Display of the TRACK-Menu shows the full, unmodified length of the Track. After changing looppoint positions with the BOUNCER-Bars or the STRETCH-Wheels you will see the resulting LOOP-Area here. Sliding the displayed LOOP-Area will move the looppoint positions accordingly.
7. Sequencer
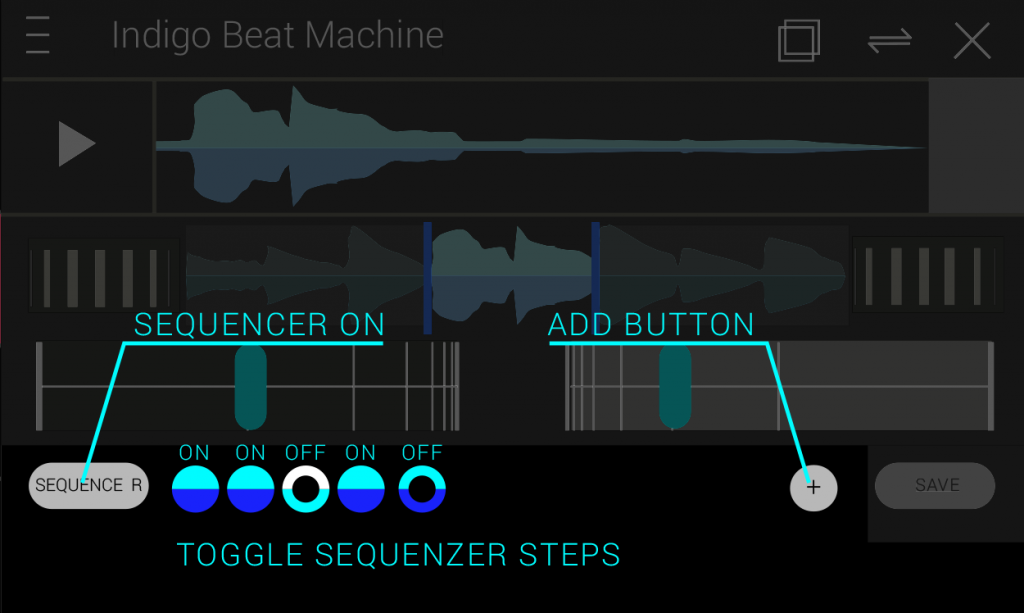
By Clicking the SEQUENCER Button you will activate the STEP SEQUENCER for this Track. Toggle the steps ON and OFF to create rhythmic patterns! With one Click on the small ADD Button you can change the size of your SEQUENCER Pattern.
8. Save
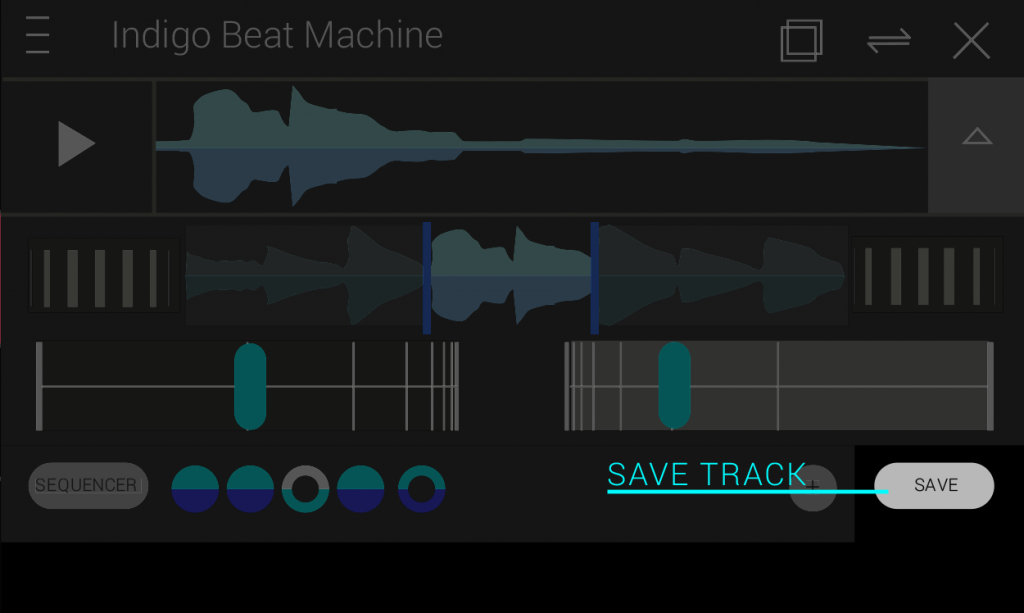
By Clicking the SAVE Button inside the TRACK-Menu you will save this Track as it sounds right now! A WAV File will be generated with 16bit, and a standard 44.100kHz Samplerate – for this heavy RESAMPLING computation might be involved – just be a little patient!
HAVE FUN CREATING !
your Indigo Engineering Team
For Ideas, Suggestions and BUG-Reports please contact us.
msizi December 16, 2016
Indingo-engineering is best
msizi December 16, 2016
Indigo-engineering i like it
Mango de kally February 24, 2017
I want to use my beats to produce my own music or I want to put mp3 in my beats
indigo October 8, 2017
You can already do this with the integrated mp3 Cutter App!
John shivers October 8, 2017
So far I really like this app! Very interesting and creative. Still learning.
John shivers October 9, 2017
How do u store more beats? Having a little trouble understanding. Please help.
Vernando Bailey December 25, 2017
how can i post my Beat on youtube and how comes it dosent pop up and my music, i dont get it?
indigo December 28, 2017
Hi Vernando, all of your beats are inside a “beats” folder on your phone (any filesystem explorer can find them). Also you can share your beat via email and from there put it onto youtube. Hope that helps! Best J.
Logan March 15, 2018
How do you share
indigo January 23, 2019
Hi Logan,
sharing through soundcloud was disabled a long time ago…
A new sharing functionality will be coming eventually! This in progress!
Best J